Full Featured Email Server in Ubuntu
This tutorial has been written to outline the steps to install and configure a full featured email server.
Obejectives:
- Have a light weight email server
- All software should be free of charge (of course!)
- Easy to use and configure
List of Components:
- Postfix: SMTP service
- Dovecot: POP3/POP3S, IMAP/IMAPS,
- Managesieve service
- Apache: Web server
- MySQL: Storing mail accounts and application data
- Amavisd, SpamAssassin,
- ClamAV: Anti-spam, anti-virus
- Roundcube: Webmail
- Awstats: Apache and Postfix log analyzer
- Fail2ban: scans log files (e.g. /var/log/apache/error_log) and bans IPs that show the malicious signs -- too many password failures, seeking for exploits, etc.
- iRedAdmin: A basic, free & open source administration panel to manage the mail accounts
- Webmin: A full featured, web based system admin tool to manage the server remotely
- OpenSSH: A service to access the CLI interface remotely.
Step 1 (Ubuntu Server Base Installation)
Install the base server components. Do not install any extra components at the tasksel screen.Once the installtion is complete run the following commands to bring the installation up to date with the latest software components on the online repos.
sudo apt-get update
sudo apt-get upgrade -y
Assign a static IP to the box.
In order to assign a static IP address execute the following commands on the CLI
sudo nano /etc/network/interfaces
Once in the interfaces file the display should like something similar to the below screen grab

Make the following changes

Make sure the server has a FQDN configured. In order to do so execute the following on the CLI.
sudo nano /etc/hosts
Edit the lines to look similar to the below. Remeber to add tabs between instead of spaces!
127.0.0.1 localhost
127.0.1.1 <ServerName.domain.local> <ServerName>
<IP_Address> <ServerName.domain.local> <ServerName>
Reboot the computer to apply all changes.
Step 2 (OpenSSH Installation)
Execute the following command to complete this step
sudo apt-get install openssh-server -y
After the installation is complete download putty from here. Open Putty.exe is downloaded on your desktop computer open it and enter the IP of the server. You will receive a warning about adding SSH keys, click "Yes" and you will be presented with a remote loin screen to the server.
Step 3 (Install Webmin)
Execute the following commands
sudo pico /etc/apt/sources.list
Once the file opens add the following lines to the end.
#Webmin
deb http://download.webmin.com/download/repository sarge contrib

deb http://webmin.mirror.somersettechsolutions.co.uk/repository sarge contrib
Then close the file after saving it and execute the below.
sudo su
cd
wget http://www.webmin.com/jcameron-key.asc
apt-key add jcameron-key.asc
exit
sudo apt-get update
sudo apt-get install webmin -y
Step 4 (iRedMail Installation)
Visit this page and download the latest release of iRedMail. In order to do this copy the link to the actual file (Right click on the file and click on "Copy Link Location" (in Firefox). Open a SSH session (via Putty, see Step 2) and run the following command.
mkdir iRedMail
this will create a new directory under your home directory. change the directory to the newly created one.Then type wget and right click inside the putty session. If the link was copied it will be pasted on the session. The set of commands to accomplish these tasks are as follows.
cd iRedMail
wget https://bitbucket.org/zhb/iredmail/downloads/iRedMail-0.8.6.tar.bz2
ls
The screen should look like this after all the above commands have been executed.

Let's go ahead and extract the downloaded file as it is a zipped archive. Type the following. The "x.y.z" stands for the version number on the file.
tar xjf iRedMail-x.y.z.tar.bz2
This will create a new folder iRedMail-x.y.z If you type ls this is visible. CD to the folder.
cd iRedMail-x.y.z
Let's install it (finally!)
sudo bash iRedMail.sh
Here are the screenshots of the setup steps.
Figure 1
 Tab to "Yes" and hit enter
Figure 2
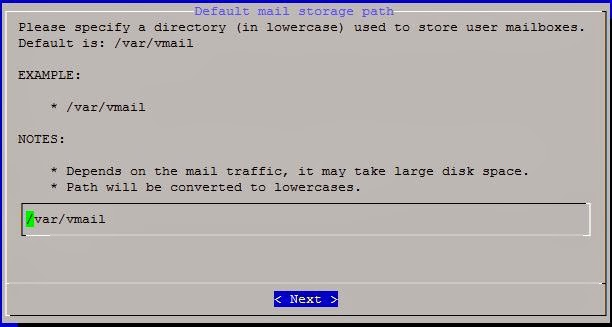
Figure 3
 Let's select MySQL as it is less complicated. Again OpenLDAP would be my choice as it is far more scalable. and besides that's the application that is built for directory work! But let's go with MySQL on this occasion.
Figure 4
 Well read the instructions and do as it says!
Figure 5
 Add the actual domain name here! The external domain that you would expect the emails to land in.
Figure 6
 Again enter the password for the admin user.
Figure 7
 Allow all the items to be selected (this is by default) and select "Next".
Figure 8
 Well hitting "y" would be helpful here :-)
This will start a bit of a lengthy installation/configuration process. Sit back and have a coffee. I know how tiring all this would have been!
Once the installation is complete here are the URLs to go to and here starts the fun stuff!
Webmail: http://your_server/mail/
postmaster@<your_domain> / Password given during installation
See Figure 6
Admin panel: https://your_server/iredadmin/
postmaster@<your_domain> / Password given during installation
See Figure 6
phpMyAdmin: https://<IP_of_Server>/phpmyadmin/
root / Password given during installation
See Figure 4
Awstats: https://<IP_of_Server>/awstats/awstats.pl?config=web (or ?config=smtp)
postmaster@<your_domain> / Password given during installation
See Figure 6
Webmin http://<IP_of_Server>:10000
The user you login to the server with and the same password
Tip:
In case none of the above sites can be accessed it is not an problem with the installation. Instead the installed iptables firewall is blocking all the incoming connections and in turn blocks access to all the above. To resolve this do the following (Please be aware that this is a temp measure only.Resolving the issue is outside the scope of this document)
sudo services iptables stop
Here ends my little tutorial. Hope it comes in useful people!
No comments:
Post a Comment